
Setting up a new server is easy and only takes 5 minutes. Once you receive your new VPS/server login details, you need to configure it to make it more secure. In order to follow our tutorial, make sure that you have a root account and you can connect to an SSH account. If you have a GUI Access, you can also use terminal area to run root commands.
Once you receive your server IP address and main root password, you can connect to an SSH Account using your server IP address and password. By default, the CentOS 6 port is set to port 22 so you don't need to ask yourself what your SSH port is.

Step 1: Connect to SSH
We can connect to our VPS/Server via any SSH client like PuTTY, which is available for Linux and Windows. If you are a Mac OS user, you can use "Terminal.app", which is available from Menu > Shell > New Remote Connection.
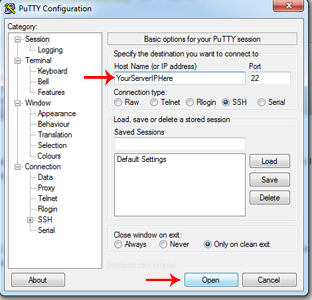
If you use PuTTY, it will ask you to enter username and password. If prompted, enter "root" (without the quotes) as a username and your VPS/Server password if you are connecting to your server for the first time. Your server may ask you to "verify host verification key". If asked, click on "yes".
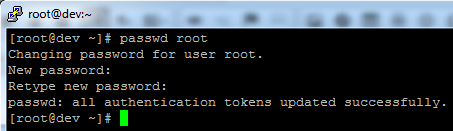
Step 2: Change the default root password
Once you are connected, execute this command to change the password of your main root account and follow instructions.
passwd root
It will ask you for a new password. You should enter a secure password, which includes special characters like "$ or #" and has a length of at least 8 characters. Make sure you remember your password, save it on your local pc in a safe place or write it down in a notebook so in case you forget, you won’t have to worry.
Step 3: Create Sudo user
Running or installing a script or software using the main user account can cause some unwanted issues and is not recommended for security reasons. However, you can create a sudo user with root privileges. It will be a more secure option for you.
If your name is Mike, you would want to create a sudo user with your name. However, should you want to use a different name, replace it with your username.
Run this command to create a new user:
adduser mike
Now we need to set up a new password for the newly created account.
passwd mike
Assign administrative privileges to your new user.
If you run commands using the newly created sudo account, it will display an error like "permission denied". It means we will need to grant administrative privileges to our new account. By default, this command uses CentOS’s default "vi" editor.
visudo
Under the line that looks like the following line
## Allow root to run any commands anywhere
root ALL=(ALL) ALL
add the following and replace the username with your user. You can press "a"(without quota) to start editing.
mike ALL=(ALL) ALL
After you add this line, it will look the same as in this example.
## Allow root to run any commands anywhere
root ALL=(ALL) ALLmike ALL=(ALL) ALL
Now save your changes and exit from the "vi" editor. Press [Escape/ESC] button and type : (colon) and wq – If it does not exist then press "Ctrl+C" and type :wq
Now you can access your newly created account by using your username and password and be able to make changes to your system or install software.
Step 4: Change SSH default port and disable root login
The default port is often subjected to brute-force attacks, which is bad for security. It is best to change your default port 22 to a different one. You can use any port from 0 to 65535.
Login to your newly created account and execute this command:
sudo vi /etc/ssh/sshd_conf
Find the following line
Port 22
PermitRootLogin yes
Now change port number to a different port. If you change it to 1212 and disable root login, you will only be able to access your SSH account from your new user account.
Port 1212
PermitRootLogin no
Add the following line in the beginning or the end of file and replace the username "mike" with your username.
AllowUsers mike
Exit from vi editor and restart SSH server to save changes.
service sshd restart
We need to open our new SSH port in the firewall, otherwise, next time we could fail to connect to an SSH account. Execute this command and replace the port with your port
iptables -A INPUT -m state –state NEW -m tcp -p tcp –dport 1212 -j ACCEPT
Extra (Optional)
Display SSH warning message on login
You can display a warning message for users in case any unauthorized person tries to login to your system or in case you have multiple VPS and want to add a custom message. You can either follow or skip these steps as they are optional but it is a good practice to follow them.
vi /etc/motd
Add a message like this one, save it and exit from vi command.
Welcome to Dewlance
Your IP and login information have been recorded.Unauthorized access will be fully investigated and reported to the appropriate law enforcement agencies so please exit immediately.
Next time you try to log in, you will need to use your new port number, instead of the default port 22, and you will see your custom message displayed on the console.
No responses yet