
You don’t need to slow down your server in order to protect your VPS/Server from a DDoS attack targeting an Apache port when using our unique method for handling this.
Introduction:
We will use a firewall or IPTables to prevent DoS/DDoS attack but this does not require from you to reduce the speed of incoming requests. We employ a simple method to prevent a potential attack from targeting a port but your page is still served to visitors.
What is CSF?
Full form of CSF is “ConfigServer Security & Firewall”, This is used by most of hosting company to secure their server from DoS attackers, hacking,etc and this is also useful for newbies. CSF is completely free firewall software.
cPanel is required?
It does not matter If you are using cPanel VPS or not, You can do this on any other control panel which support CSF firewall or also possible with other firewall or even IP tables can do this but I never try this so I will only tell you about how to do this on CSF/cPanel or without cPanel.
Requirements:
- VPS/Server with us or any other provider.
- CSF Firewall or IPTables.
- Root SSH Access on VPS/Server or If you are using cPanel then WHM Access is sufficient but CSF must be installed on your cPanel’s WHM.
What I need to do If I have a cPanel/WHM + CSF?
If you are not expert in SSH commands then It will be better for you do this via cPanel.
Warning: By doing this, Your apache server can be down for few minute until you complete this steps.
1. Login to your WHM Account by visiting https://$site-address.com:2087
2. In WHM Area, Scroll down to the “ConfigServer Security&Firewall” and click on it.
3. Now click on the “Firewall Redirect” button.
![]()
4. Paste this code in the text box, replace the IP and port with your custom IP/Port and click on the “Change” button. Don’t forget your newly-added firewall port because you will need to add this to Apache and open this port in firewall so your website can work properly.
123.xx.0.1|80|123.xx.0.1|2266|tcp
123.xx.0.1|80|123.xx.0.1|2266|udp
Take a look at this screenshot and it will be easy for you to understand how redirecting looks like.
CSF will ask you to return or restart the firewall. To make changes in the firewall, click on the “Restart csf+lfd” button.
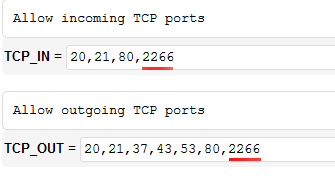
5. As you can see on our previous screenshot, we’ve added a port 2266 for redirecting so now you should go back to the CSF firewall’s main menu. Once there, click on the “Firewall Configuration” option and add our newly-added port to the TCP_IN and UDP_IN field. Then scroll down to the end of page and click on the “Change” button. Afterwards, click on the “Restart csf/lfd“.
6. Now we need to change the Apache listening port in cPanel, Go to Server Configuration >> Tweak Settings and click on the “System” tab.
In “Apache non-SSL IP/port” field, change the setting from “default :80” to a custom setting and enter your new Apache listening port with 0.0.0.0 IP address like “0.0.0.0:2266“(without the quotes). Then click on the “Save” button.
Now it is time to check whether your website is working or not. Open your website and if does not work, restart the Apache services from WHM.
How to prevent DDoS attack using CSF only? (If you don’t use any control panel)
Open the file /etc/csf/csf.redirect in nano or vi editor, paste the following code, replace the IP with your IP address and redirect port 2266 to your new port:
123.xx.0.1|80|123.xx.0.1|2266|tcp
123.xx.0.1|80|123.xx.0.1|2266|udp
Restart csf by running this command in your Dewlance SSH area:
csf -r
Now we need to change the listening port in httpd.conf (Apache config)
Open this file:
/usr/local/apache/conf/httpd.conf
Change the line
Listen 0.0.0.0:80
To
Listen 0.0.0.0:2266
(Don’t forget to replace the old port number with the new one)
Now restart the Apache services by running this command: (CentOS/RHEL)
service httpd restart
For Ubuntu users:
sudo service apache2 restart
How to redirect Apache default port in Iptables?
Before running this command, change the IP address to your server IP address and port 2266 with your choice of port.
iptables -t nat -I PREROUTING --src 0/0 --dst 123.0.0.1 -p tcp --dport 80 -j REDIRECT --to-ports 2266
Now run this command to make changes to iptables (CentOS/RHEL)
service iptables saveservice iptables restart
Now change the listening port from the default port 80 to your new redirecting port in the Apache config file /usr/local/apache/conf/httpd.conf and restart Apache by running “service httpd restart” command (without the quotes).
No responses yet