Admittedly or not, WordPress is one of the few rulers in the world of the Internet today, coupled with Google, Facebook and so forth. This platform is the most widely used blog platform in the world, even beating the blogger platform by Google. Therefore, knowing how to install this platform into your operating system is something very important, especially if you’re using Ubuntu. However, the WordPress installation process is very simple since it only requires a LAMP or LEMP server running on your Ubuntu. This article will explain step by step to install WordPress on Ubuntu 18.04 Bionic Beaver Linux. The version is one of the latest versions of Ubuntu.
Why you need WordPress
WordPress has positioned itself as the main content management system (CMS) almost since its inception in 2003. This is mainly because it is very intuitive and is focused on creating all kinds of websites, both pages and blogs. with professional appearance. However, there are more reasons that have led WordPress to success and here are the three ones:
Great ease of use: It is a very simple to use CMS with a very intuitive interface, something that facilitates the creation of new pages, blogs and other digital formats, including online stores.
- You can work from any device: We can access WordPress from any computer connected to the Internet and manage our site, which facilitates the periodic creation of content.
- The user does not need programming knowledge: thus, we can create new pages, posts in blogs, share images or videos, all without the need to handle additional HTML or FTP.
You may need some additional PHP packages since WordPress is an application with a large enough capacity. This need is based on the fact that WordPress is built with PHP. Therefore, the associated hosting process can be done on the same way when you are dealing with other PHP-based web applications. In a practical level, you need to make sure your Ubuntu runs as a LAMP and LEMP server.
You must create your database at first!
Have you created a specific WordPress database when running LAMP/LEMP setup? If not, you must prepare a specific database. You need to sign in to MySQL as the root user. Type the following command:
mysql -u root –p
Got in MySQL? Then create a new database now! Just follow the steps below:
mysql> CREATE DATABASE wordpress;
Create a new user for it too.
mysql> CREATE USER `wp_admin`@`localhost` IDENTIFIED BY 'yourpass';
Grant your new user permissions on the DB.
mysql> GRANT ALL ON wordpress.* TO `wp_admin`@`localhost`;
Flush your privileges and exit.
mysql> FLUSH PRIVILEGES;
Now you can get your WordPress!
The WordPress platform include some packages, all are not always up-to-date. Because of its “not always up-to-date”, getting WordPress security is a need. You should get your WordPress directly from WordPress’ official site. You can grab the last version using the followings:
wget https://wordpress.org/latest.tar.gz
Then extract the archive into your target location (where your web root will take place).
cd /var/www
sudo tar xpf ~/Downloads/latest.tar.gz
Once done, you should give the directory ownership for the web server. Type the following:
sudo chown -R www-data:www-data /var/www/wordpress
The next step is to configure the web server
Your configuration steps will be determined by your choice. The point is that your decision to use the Apache or Nginx server is crucial in this step. You may be considered hosting on the server while you are managing more than one site. Virtual hosts are what allow you to host multiple sites.
If you use Apache
sudo cp /etc/apache2/sites-available/000-default.conf /etc/apache2/sites-available/wordpress.conf
Now open the configuration and do modification over the Document Root to the point. The point in question is the point where you unpacked the directory (WordPress directory).
DocumentRoot /var/www/wordpress
Once the configuration opens up, you need to set the ServerName in adjusting to your domain or local host.
ServerName your-website.com
Don’t forget to create your alias for “www version”.
ServerAlias www.your-website.com
Once done, save the file and exit. It will enable your site in Apache.
sudo a2ensite wordpress.conf
Reload your Apache.
sudo systemctl reload apache2
If you use Nginx
At first, you need to create a configuration to your WordPress-based site in the Nginx directory. Open your file and ensure it’s been in completely standard for a PHP configuration. Now try creating a new server block for your WordPress-based site. Don’t forget to ensure your Nginx configuration file updated with your installed PHP version otherwise everything won’t go well. Execute PHP–version command. Just look at the followings:
server {
	listen 80;
	listen [::]:80;
	server_name your_website.com;

	index index.php;
	root /var/www/wordpress;

	access_log /var/log/nginx/your-website.com.access_log;
	error_log /var/log/nginx/your-website.com.error_log;

	location / {
		try_files $uri $uri/ =404;
	}

	location ~ \.php$ {
		include snippets/fastcgi-php.conf;
		fastcgi_pass unix:/var/run/php/php7.1-fpm.sock;
	}
}
In the case you’re using SSL, you may need to include the 301 redirect and don’t forget to link the site configuration, followed by restarting Nginx:
sudo ln -s /etc/nginx/sites-available/wordpress /etc/nginx/sites-enabled/wordpress
sudo systemctl restart nginx
The installation
Now open your browser. In our example, we use Firefox however you can use other browsers as well. Once you get there, a screen will appear as WordPress asks you about your preferred language. Once you select it, you can go to the next stage.
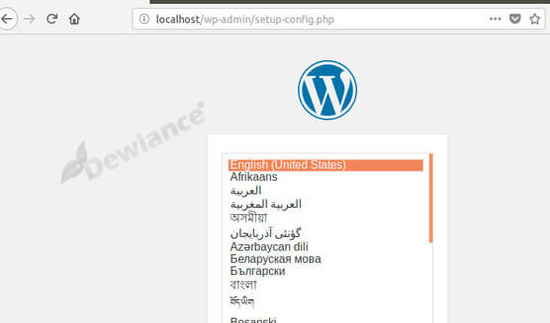
After passing the first picture above, you will see a screen saying that you need starting “run the installation“.
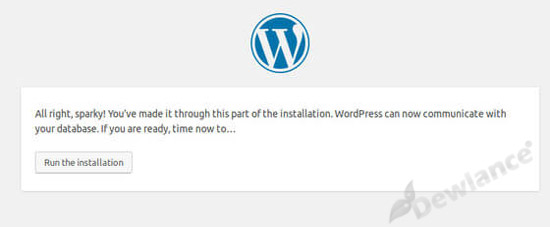
Once you run the installation, you will see a display asking you to collect all the information needed to connect to your database.
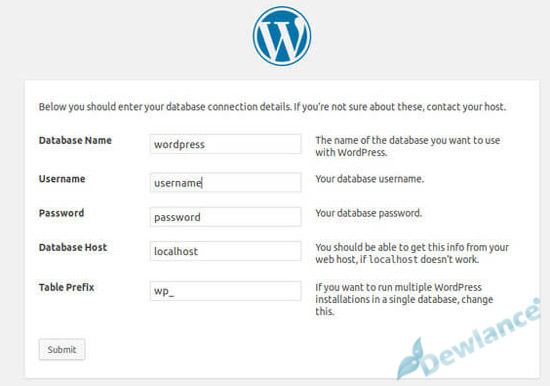
When you see a screen like above, you have to input your database information. Ensure every single information you input is correct. Once done, you’ll get a scree saying that now you’re able to begin your installation process.
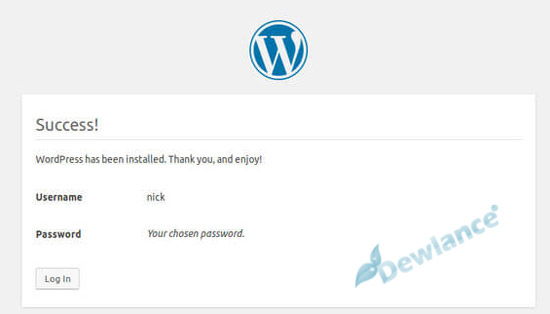
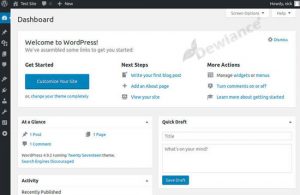
Finally, you have to sign in, and after doing this, you’ll have access to WordPress. You’ll be taken to WordPress dashboard as the admin. Now, WordPress is running well on your Ubuntu.
By using WordPress then your creativity is not limited. You can incorporate your creative ideas to develop your site better. You can even tune your server to get better security. Hopefully this article can help you to improve the performance of your site that will ultimately improve your online business. Thanks for reading!
No responses yet